Enhanced Tag Manager: user guide
Having a properly implemented tagging structure in Uberflip makes it easier to find and utilize the content you need, when you need it. With Uberflip’s Enhanced Tag Manager app, this has gotten almost too easy. This article will show you how it works.
Before you begin
- Enhance Tag Manager is an app available in the Uberflip Marketplace. You must download it to your Uberflip account to use it.
- To use Enhanced Tag Manager, your Uberflip account must have API access. This feature is included with certain pack types, or may be added on to your Uberflip subscription. To learn more, speak with your Uberflip account representative.
- There are several Uberflip permissions that affect a user's experience in Enhanced Tag Manager. Expand the section below to see what’s needed.
Permission requirements for Enhanced Tag Manager
* = required
- API Access* (granted to Admins by default)
- View Hubs >
- Custom Code* (granted to Admins and Content Managers by default)
- Manage Tags* (granted to Admins and Content Managers by default)
- Current User >
- View* (granted to Admins and Content Managers by default)
- Global Permission > List and Export* (granted to Admins and Content Managers by default)
- Hub > Custom Code >
- Create* (granted to Admins and Content Managers by default)
- View* (granted to Admins and Content Managers by default)
- App User >
- List and export: Users with this permission can view and edit app-wide settings for this app in the Installed Apps page of Uberflip.
- Enhanced Tag Manager* (granted to Admins by default) >
- Modify tag structure (granted to Admins by default): Users with this permission to create or edit Tag Groups in the app. Without it, users can still use the app to view and apply tags, but can’t make changes to the tagging structure.
Why use Enhanced Tag Manager?
Enhanced Tag Manager can help with all of your tag management needs. These can be broken into two general areas:
More specifically, Enhanced Tag Manager can:
- Help you define a tagging structure for your needs
- Help you build said tagging structure
- Allow admins more control over how their tag structure is used on content
- Allow users tagging content to apply the tag structure more easily and consistently
And with your tagging structure properly implemented, you’ll benefit from:
- Having a better overview of your content library as a whole
- The ability to quickly find the right content for specific audiences
- The ability to find and fill gaps in your content strategy
- The ability to measure the performance of your content strategy more granularly
Effectively tagged content is ready to be found, utilized, updated, or even retired quickly–giving your team more time for other things. Enhanced Tag Manager makes tagging and tag management simple.
To learn more about tags, check out: Tags explained
Organize tags:
In the Organize Tags tab of Enhanced Tag Manager, admins can:
- Create new Tag Groups
- Delete Tag Groups
- Add/remove existing tags in Tag Groups
- Create new tags
Non-admin users can view Tag Groups, but they can't create or edit them.
Note
While you can use Enhanced Tag Manager to remove tags from content, tags cannot be deleted from Uberflip within the Enhanced Tag Manager app. Tags must be deleted in Uberflip.
Don’t forget to apply your changes!
When working in the Organize Tags tab, changes made to Tag Groups aren’t saved until you click Apply Changes in the main window. Before that, all changes are pending, and highlighted with an orange dot.
Create a new Tag Group
If you already have a tagging structure plan, use the steps below to add or edit Tag Groups.
Not sure where to start?
Enhanced Tag Manager’s tag structure wizard can guide you! This will open automatically the first time you open Enhanced Tag Manager, but can be skipped if not needed.
If you do want help creating a personalized tag structure template at any time, you can relaunch the wizard by clicking Help me set up a tagging structure in the Organize Tags tab.
- In the Organize Tags page, click Add Tag Group
- In the panel that appears, use the dropdown menu to select from commonly used Tag Groups, or enter a custom group name
- Optional: Enter a Tag Group description
- Click Edit Tags
- Find and select existing tags you want to add to this group. If a tag you search for doesn’t already exist, the Create new Tag button will become active–click it to create the tag
- When your tags have been selected, click Done
- Set the display option and rules for this group:
- Sort Order: Choose how tags in this Tag Group should be sorted when tagging. You can sort alphabetically or by creation date.
- Set as Required: Choose whether a tag from this group is required for every Item
- Max. tags per item: Enter the maximum number of tags from this Group that can be applied to an Item. Or turn the toggle off if you don’t want to restrict the use of tags in this group.
- Click Save
- Back on the main page, for your Tag Group to be created, you must click Apply Changes > Confirm
And just like that, your Tag Group has been created!
Edit Tag Groups (and the tags within them)
- In the Organize Tags page, find an existing Tag Group, and click Edit beside it
- The Tag Group settings panel will appear
- Make the desired changes to the Tag Group
- To add or remove tags from the group, click Edit Tags, make your changes, then click Done
- Click Save
- Back on the main page, for your Tag Group to be updated, you must click Apply Changes > Confirm
Done!
Delete a Tag Group
To delete a Tag Group, find it on the Organize Tags page, and click Delete beside it.
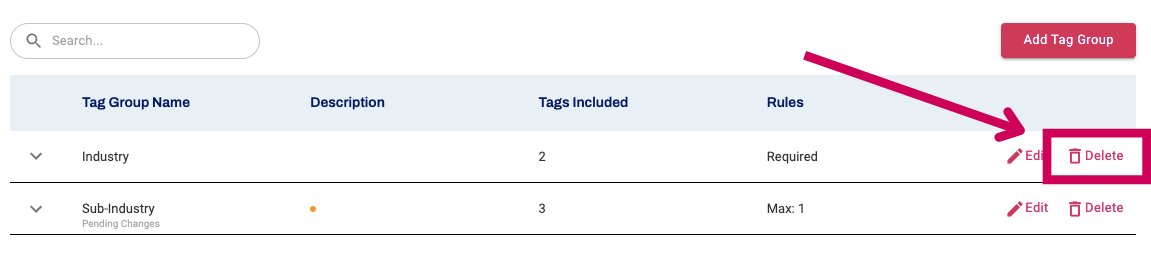
Important
When a Tag Group is deleted, the tags within it will be moved back into the ’unassigned tags’ group, which exists as a default in your Uberflip account. The tags will remain on any Items they’re applied to.
Tag content:
A great tagging structure means nothing if the tags aren’t applied to Items. Enhanced Tag Manager can help with this.
In the Tag Content tab of Enhanced Tag Manager, you’ll find a filterable list of all the content in your account.
You’ll also see current stats for how much of your content is tagged based on the rules set within your Tag Groups. This is called the completion score.
Completion score explained
Your completion score outlines how much of your content has been tagged according to the rules set in your Tag Groups. This is the percentage of Items containing tags from Tag Groups that are set as required. You’ll also see a breakdown of completion for Flipbooks, videos, and blogs.
By default, you’ll see the account-wide completion score displayed at the top of the Tag Content tab.
To see the completion score specific to a Hub, click the Hub dropdown and select a Hub.
Completion Score also shows as a score on individual Items in the app. This score is based on how many required Tag Group tags have been applied to that Item.
Example
If you have two Tag Groups set as required, and an Item has a tag from one of those groups, the completion score would be 50%. Adding a tag from the second required Tag Group would then move the completion score to 100%.
Tag Items
When you have Items that need tags, Enhanced Tag Manager can make tagging quick and simple. Here’s how:
- In the Tag Content page, use the available controls (search, selectors, and filters) to find Items that need to be tagged
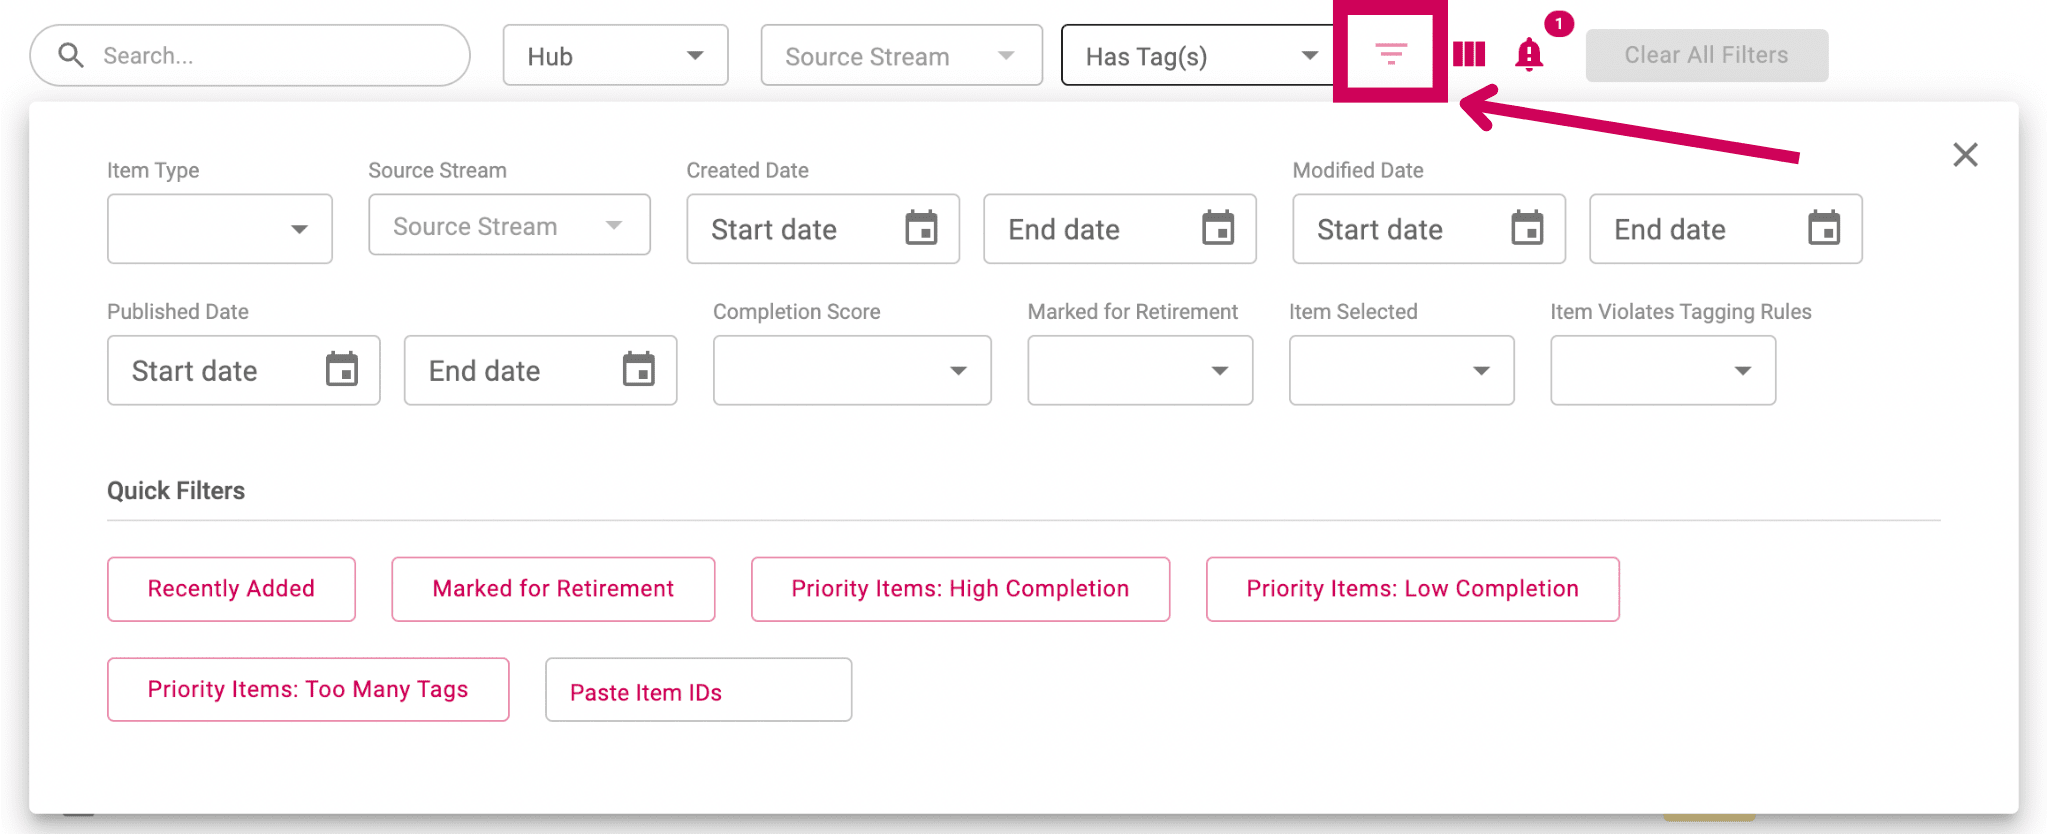
Tip: Quick Filters
Quick filters allow you to easily apply popular filter criteria like recently added, or low completion. Selecting a quick filter will override any currently selected filter options.
- From the list that forms, select the Items you want to tag. You can choose to select all shown by checking the box in the list header row, or select Items one by one.
Note: A dropdown below the list allows you to work with more rows. - Click Tag Selected Items to open your ‘To do list’
- Select an Item in the list. You’ll see a preview of the Item and your Tag Groups
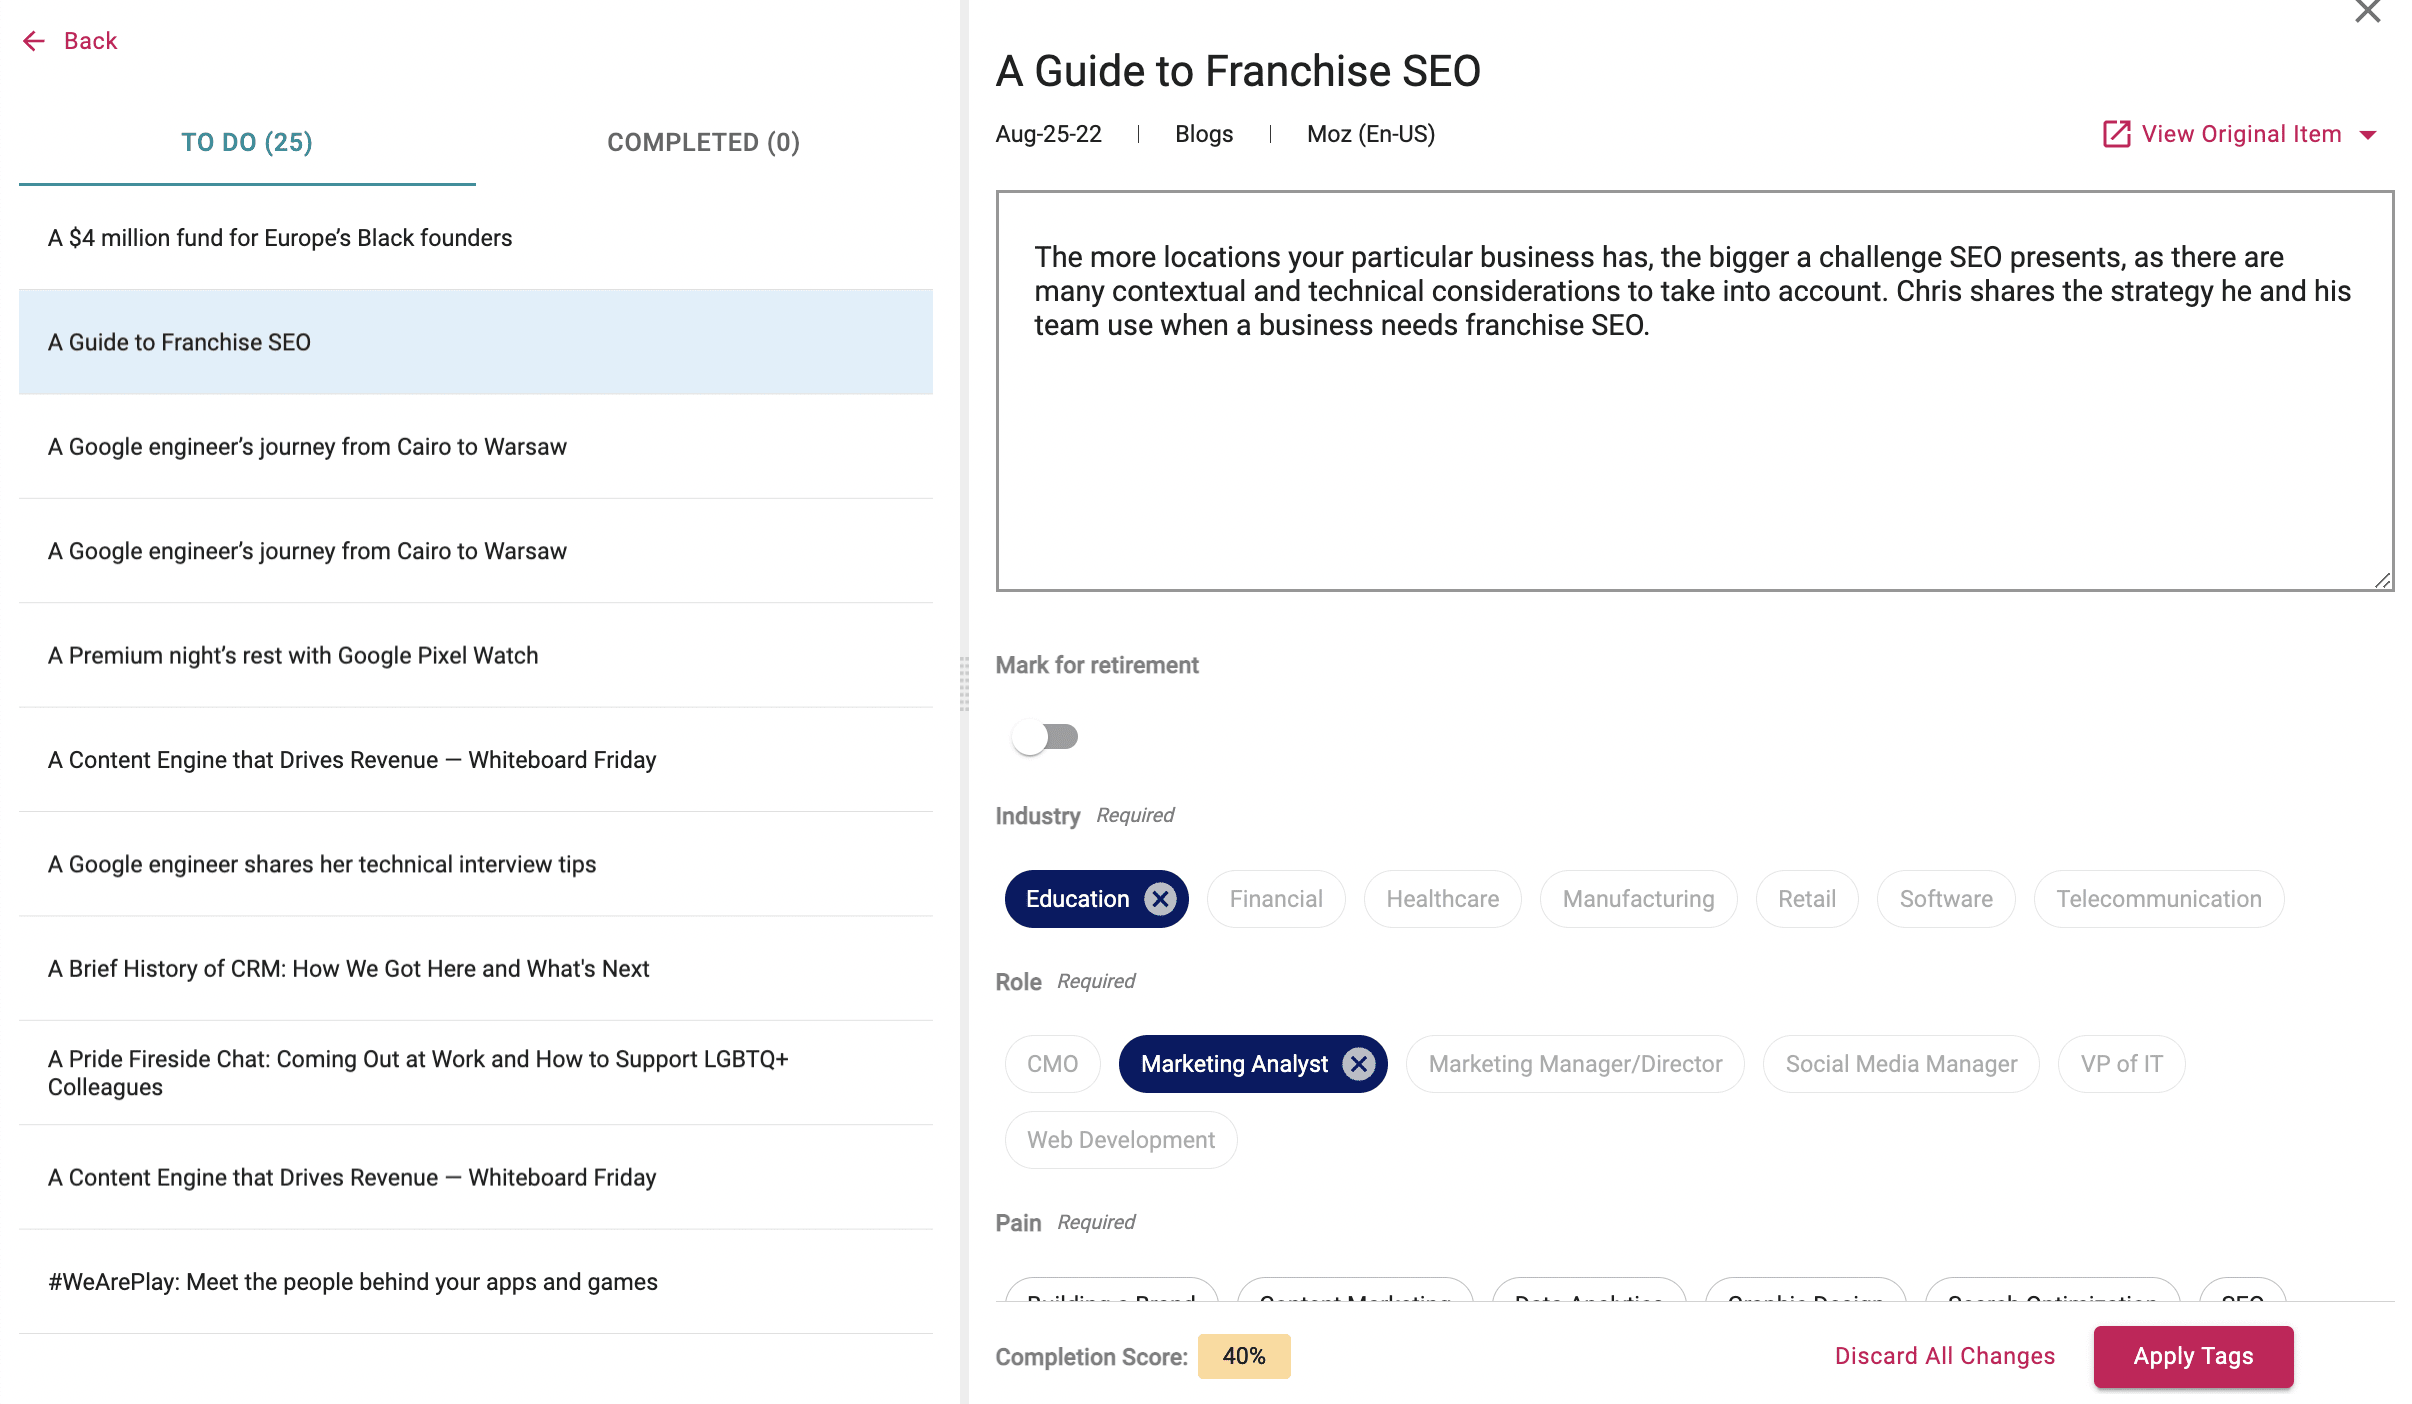
Note: Tag Groups set as required count towards your completion score. - Click tags that are not highlighted to add them to the Item. Or click highlighted tags to remove them.
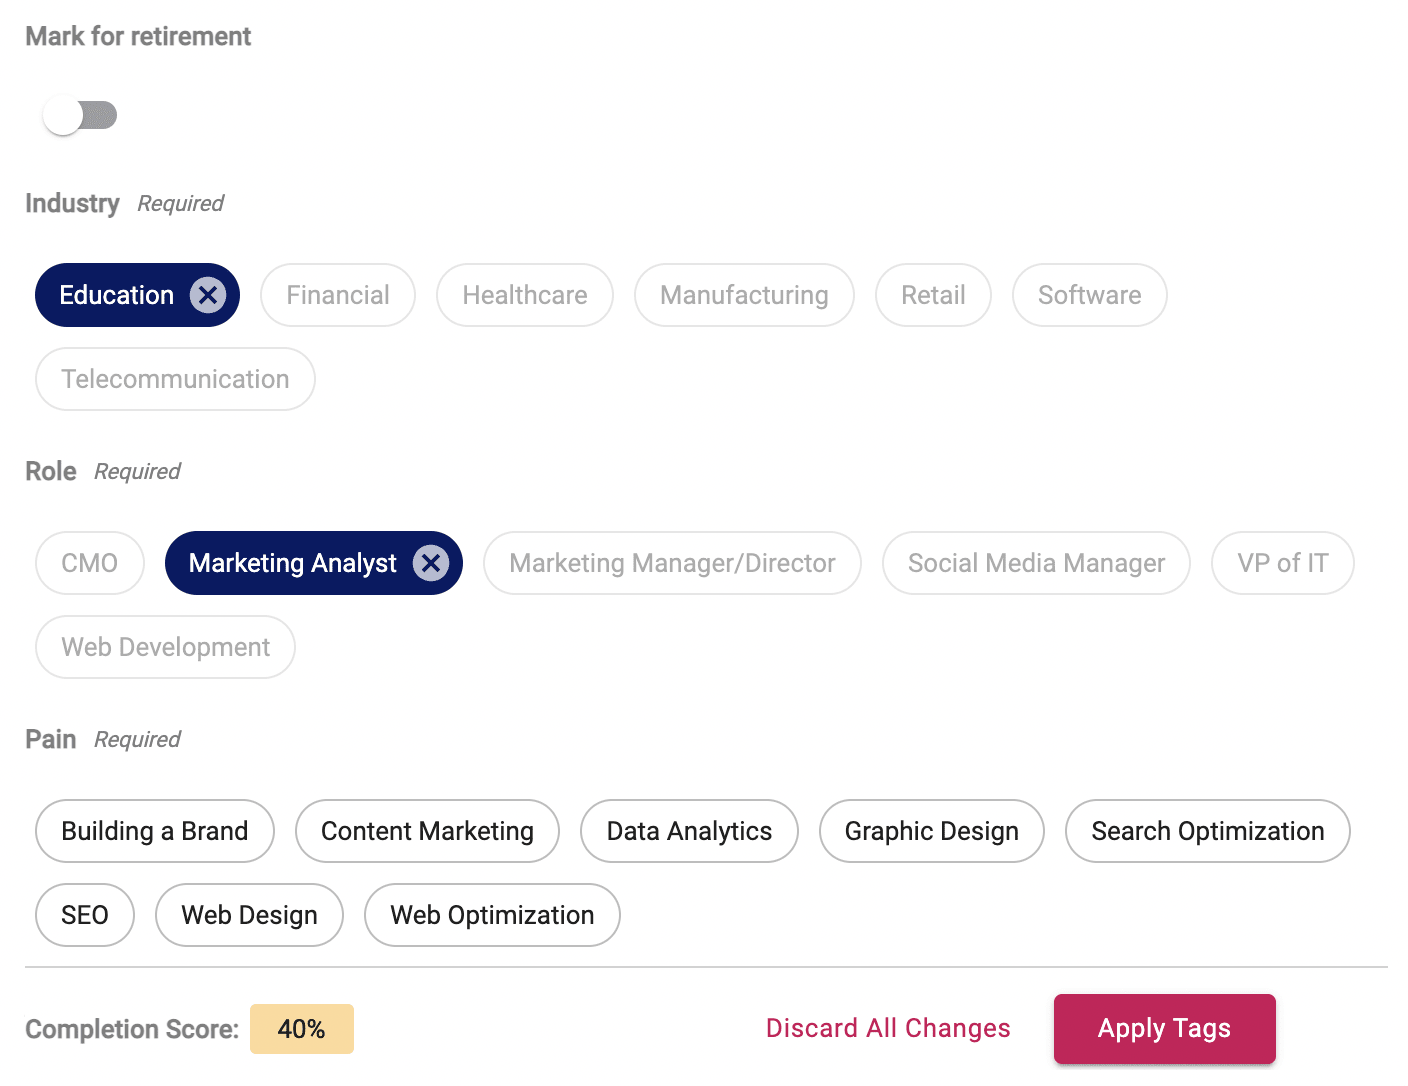
Found an Item that's reached the end of its usefulness?
Switch on the Mark for retirement toggle to apply the ‘retire’ tag, and eliminate the need for further tagging. Customize the ‘retire’ tag in the app settings.
- Click Apply Tags
When you click Apply Tags, that Item will move to the completed list and the next Item in the to-do list will load.
Keep going until your to-do list is complete. When done, create another list of priority Items and keep tagging. The more you tag, the more your completion score will increase.
Tip: Quick Tagging Mode
Need to just quickly apply tags to (or check the current tags on) a single Item? No need to build a to-do list: just click on any Item in the table on the Tag Content page to enter the tagging view for just that Item.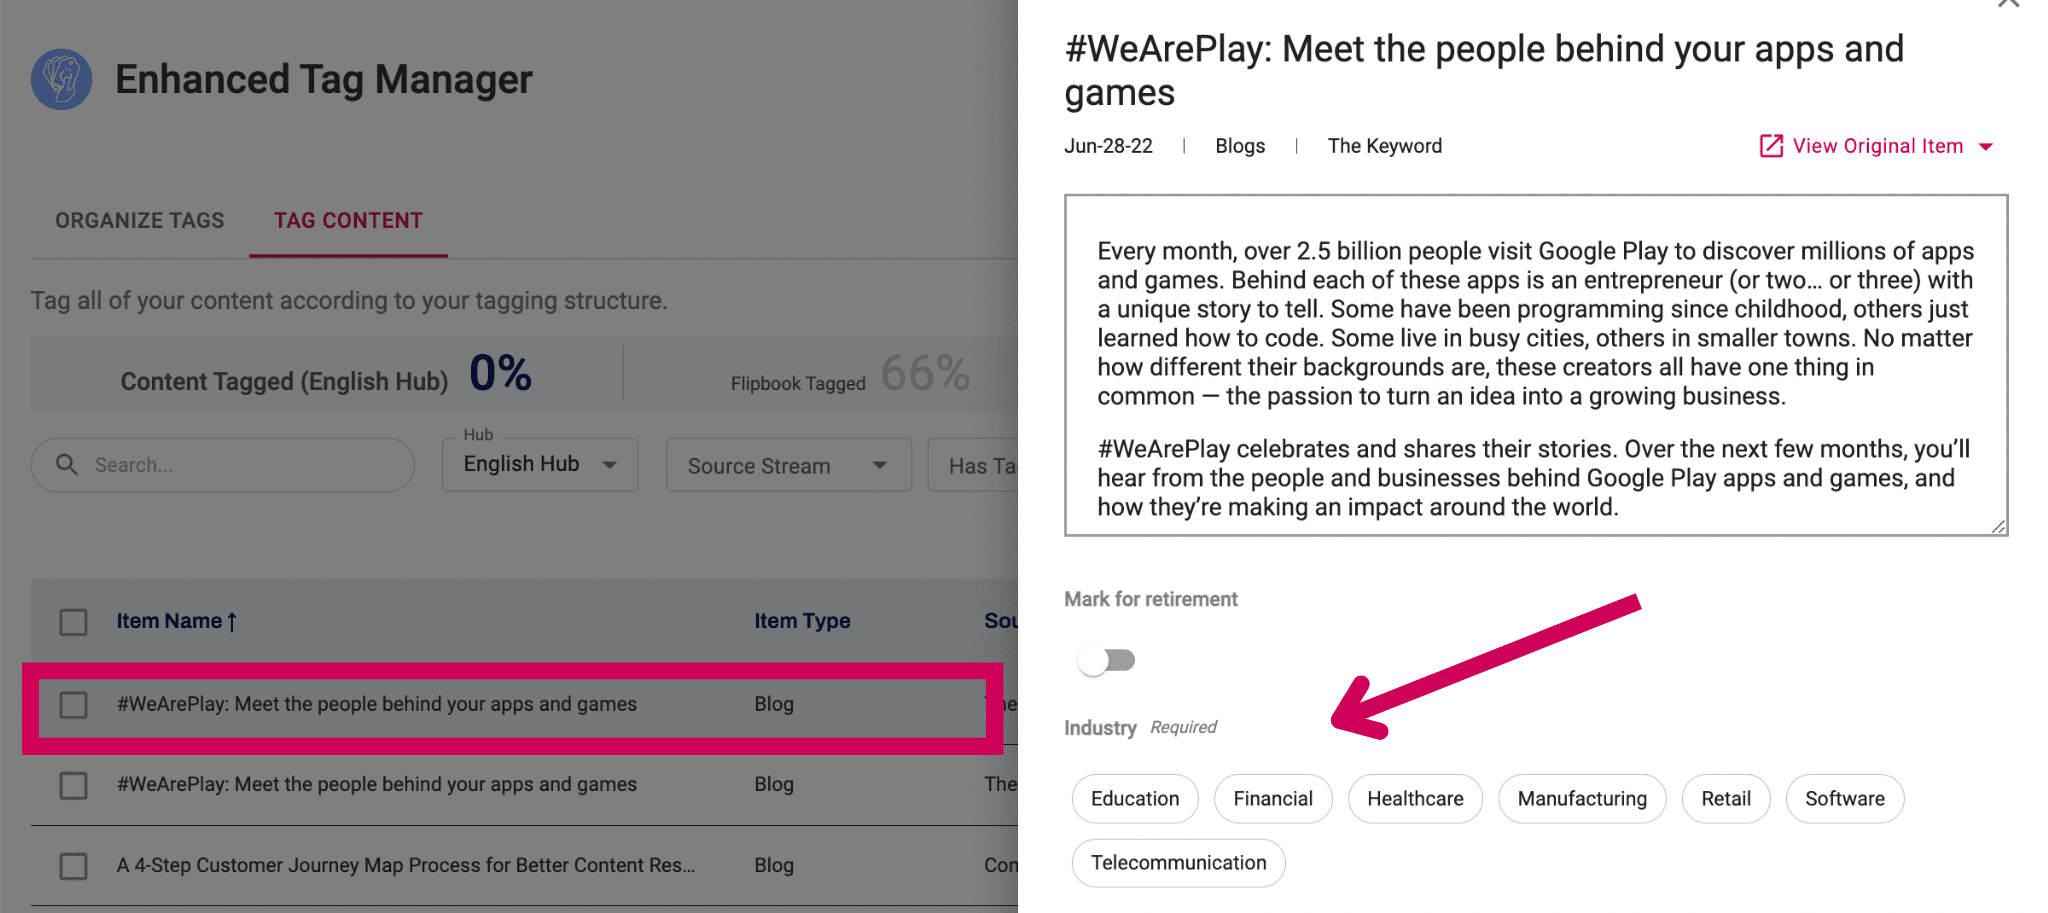
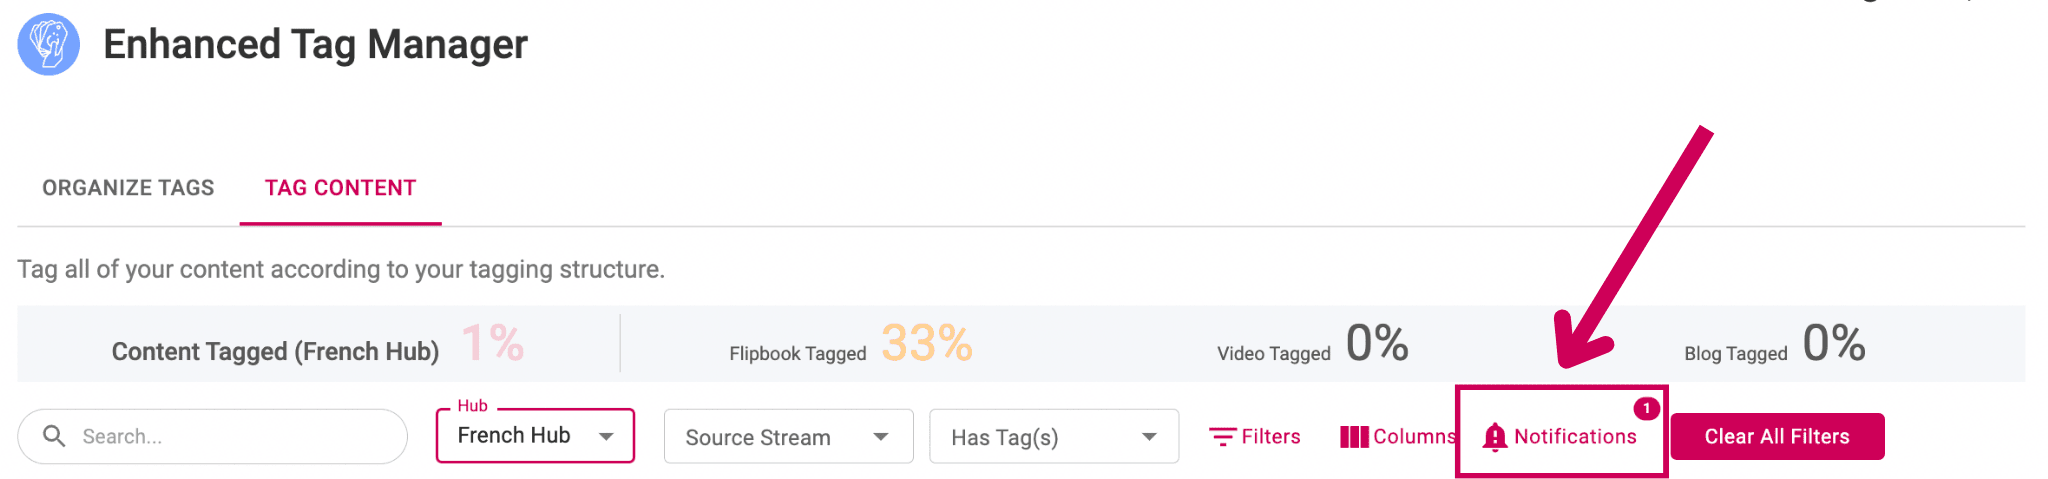
Notifications
In the Tag Content tab, Enhanced Tag Manager will display notifications when it finds errors, like Items that are breaking your Tag rules. These will help you stick to your rules and tag structure.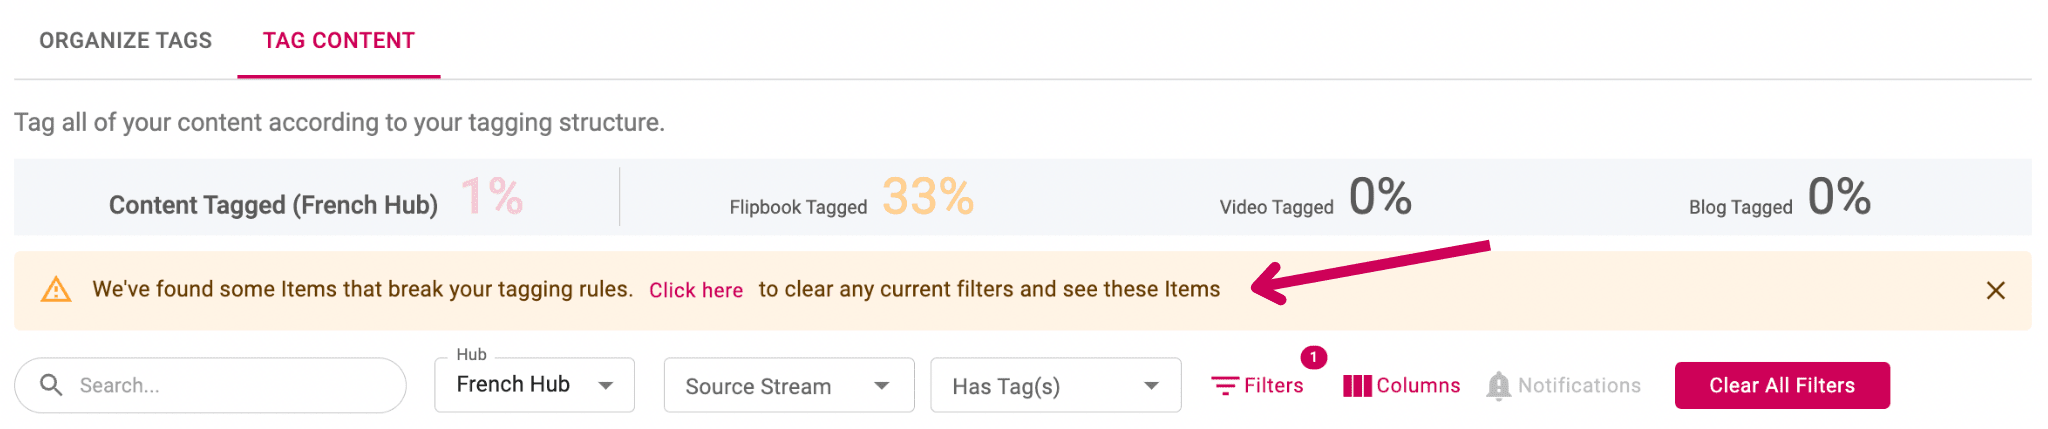
To dismiss a notification, just click the X on it.
Notifications that are still active, but have been dismissed, will appear in the notification center, shown as a bell icon in the control bar. Click there to open your dismissed notifications, so you tackle the issues they highlight.
App settings
There are two app-wide settings (retirement tag and strict tagging rules) that are controlled in the Installed apps section of Uberflip. Admins (and any user with the App User > List and export permission) can edit these settings. Expand the section below to learn more.
- In the Uberflip topbar, hover over Marketplace, then click Installed Apps
- Find Enhanced Tag Manager in the app list, and click the edit (pencil) icon beside it
- On this settings page you’ll find two settings you can change:
Set custom “Mark for retirement” tag:
This setting allows you to enter a custom tag for Items you want to retire. By default, the tag is Retire, but you can enter any tag name you’d like.
While tagging content in the Enhanced Tag Manager app, turning on the Mark for retirement toggle will apply this tag to the Item. This will make it easier for content auditors to find and archive outdated Items.
Use strict tagging rules validation for required tag groups:
When enabled, this setting prevents users from applying tags to an Item until they’ve selected at least one tag from every tag group set as required.