Add HTML, CSS, and JavaScript to your Hub with Custom Code
Learn how to add Custom Code to your Hub to customize nearly any aspect of it's appearance and functionality.
Before you begin
IMPORTANT: considerations and warnings
If you choose to Custom Code in your Hub, you do so at your own risk. There are many things to consider before using custom code, such as:
- The limited troubleshooting we can do at Uberflip if issues arise
- How you'll implement version control (this is not native to the Custom Code feature)
- How changes to the Uberflip base code may impact your Custom Code in the future
- Local regulations (such as GDPR)
Please read Using custom code: considerations and warnings before implementing custom code. That article outlines warnings and things to consider before perusing a custom code solution.
- To use Custom Code, you need to be an Account Admin or Content Manager.
- If you do not feel comfortable using Custom Code yourself, but want to take advantage of the customization options it offers, our OnBrand Team can help. For more information, please contact your Customer Success Manager or Uberflip Support.
- This article does not include a description of how the Uberflip Hub front end works, such as element IDs, classes, etc. For this type of information, please refer to our developer guide to customizing the Uberflip Hub front end.
What does Custom Code do?
Uberflip comes with a variety of built-in options for customizing the look and feel of your Hub. But what if you have a vision for your Hub that you can't achieve with these tools? If you're comfortable with writing code, you can use the Custom Code feature to go beyond the standard customization options and change your Hub's appearance and functionality in all kinds of ways.
With Custom Code, you can create your own snippets of code in HTML, CSS, JavaScript, or any combination of these languages. You can then add these snippets to your Hub, and run them on top of the code that runs the Hub.
Here are just a few of the things you can do with Custom Code:
- Customize your Hub's design elements, including menus, text, images, and more
- Modify the behaviour of different Hub elements, such as Item Tiles and CTAs
- Import and use custom fonts
- Add tracking pixels and other third-party scripts and plugins to your Hub
Need a little inspiration? Check out our Hub Hacks to see a variety of prebuilt code snippets.
How do I use Custom Code?
To use Custom Code in your Hub, you create Custom Code blocks. These blocks contain your code snippets along with metadata about the block, such as its name and a brief description of the code functionality.
Organizing into blocks makes it easy to manage your Custom Code. You can see at a glance what you've added to your Hub, and can quickly enable or disable specific code snippets by toggling their respective blocks on and off.
Within a block, you can create code snippets with any combination of HTML, CSS and JavaScript, and define the placement of the snippet within the larger Hub code.
Lastly, if you use Custom Code to implement tracking pixels or other functionality with privacy implications, you can assign specific blocks to Privacy Groups. These are tied to settings that visitors to your site can use to opt into or opt out of tracking scripts, which is a GDPR compliance requirement. You can find more information about Privacy Groups and how to use them in this article.
Step 1: Create a Custom Code block
If you want to deploy Custom Code on your Hub, the first thing you need to do is create a new Custom Code block to contain the code.
- Log in to your Uberflip account and navigate to the Hub where you want to add the Custom Code block.
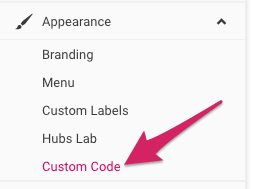
- In the sidebar menu on the left, click on Appearance, then click on Custom Code.
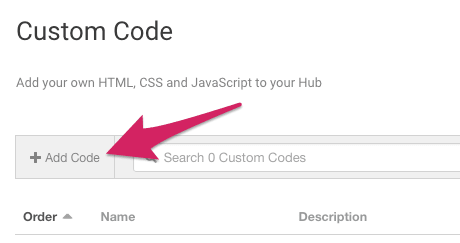
- The Custom Code menu will appear on the right. In the grey bar below the heading, click on the +Add Code button.
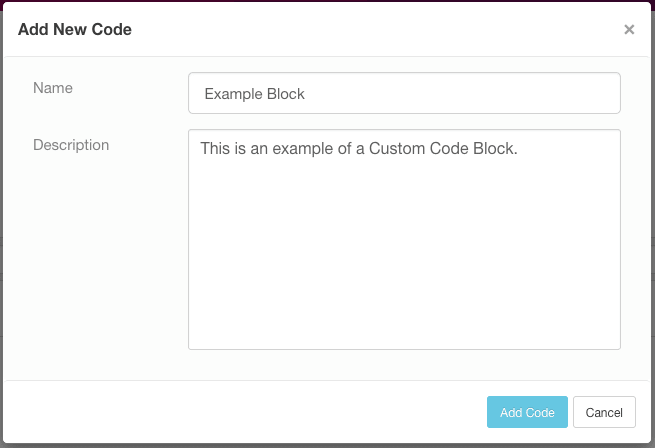
- The Add New Code window will appear. Here, type in a Name and a Description for the block into the corresponding fields. These will help you to identify the block and its purpose/functionality later. When you're ready to proceed, click on Add Code.
- Your Custom Code block will be created, and you'll be taken to the Edit block page, where you can enter your code.
Item-Level Custom Code Blocks
By default, Custom Code blocks are added at the Hub level, and the code they contain is inserted into every page on your Hub. As this is the way custom code is most commonly used, the instructions in this article assume that you are creating Hub-level Custom Code blocks.
Alternatively, you can also create Custom Code blocks at the Item level. The code contained within these blocks will be inserted into only that Item's page, not the rest of the Hub.
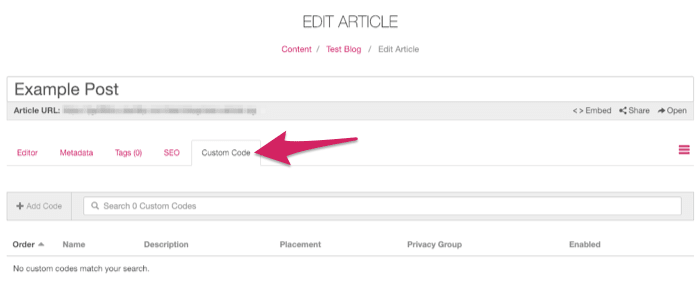
To create a Custom Code block on a specific Item, navigate to the Item (under Content > Items tab) and then click on Edit Item. Here, click on the Custom Code tab:
The process for creating and working with Item-level blocks is otherwise identical to Hub-level blocks, so the instructions in this article are directly applicable.
Step 2: Choose a placement
With the block created, you now need to choose where the code will be placed within the HTML of your Hub. In general, the placement of your code will determine where it is loaded as each page of your Hub loads. The available placements, and the order in which they're loaded, are:
- 1. Head
- Code is placed immediately before the </head> tag, i.e. at the very end of the Head section.
- 2. Body Top
- Code is placed immediately after the <body> tag, i.e. at the very beginning of the Body section.
- 3. Below Footer
- Code is placed immediately after the </footer> tag, i.e. right after the end of the Footer section.
- 4. Body Bottom
- Code is placed immediately before the </body> tag, i.e. at the very end of the Body section.
For example, all the code in the Head section will be loaded before any code in the Body Top section, and so on.
Within the HTML document, the placements look like this (standard Hub code refers to Uberflip's own code that runs the Hub):
<html>
 <head>
 <!-- Standard Hub code goes here -->
 <!-- Custom Code in Head goes here -->
 </head>
 <body>
 <!-- Custom Code in Body Top goes here -->
 <!-- Standard Hub code goes here -->
  <footer>
  <!-- Standard Hub code goes here -->
  </footer>
 <!-- Custom Code in Below Footer goes here -->
 <!-- Standard Hub code goes here -->
 <!-- Custom Code in Body Bottom goes here -->
 </body>
</html>
Below are some general guidelines for choosing a placement:
| Type | Placement | Reason |
| All CSS | Head | Loads the CSS before the rest of the page, ensuring that the page loads fully styled. |
| All JavaScript |
Body Bottom |
JavaScript can take a long time to load; loading it last avoids slow loading of the rest of the page. |
| Tracking Scripts |
Body Bottom (jQuery) Head (non-jQuery) |
Tracking scripts that use jQuery must be placed in Body Bottom (otherwise an error will be thrown). All others can be placed in Head. |
| Corporate header | Body Top | Places your corporate website's header above all visual elements belonging to the Hub. |
| Corporate footer | Below footer | Places your corporate website's footer below all visual elements belonging to the Hub. |
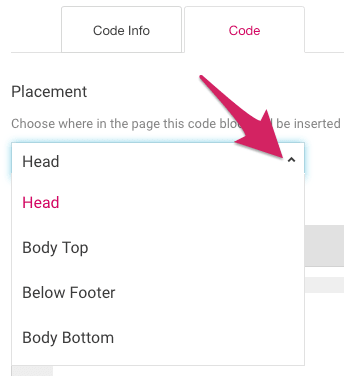
To choose the placement of your block, click on the Code tab on the Edit block page:
Then, use the dropdown menu under Placement to choose the placement you want to use.
Warning
This dropdown will immediately change the placement of the Custom Code block!
In other applications, you may have encountered similar dropdowns which are used to browse and view the code in different parts of an HTML document. This dropdown does not work the same way!
The Placement dropdown only specifies the placement of the custom code displayed below it, so changing the selection will change the placement of the code. This can have unexpected negative effects on your Hub's appearance and functionality, so please use caution when using it.
Step 3: Enter code
Once you've chosen where to place it, you can add the actual code to your block. This can be HTML, CSS, JavaScript, or any combination. Simply type your code directly into the box provided on the Code tab of the Edit Block page:
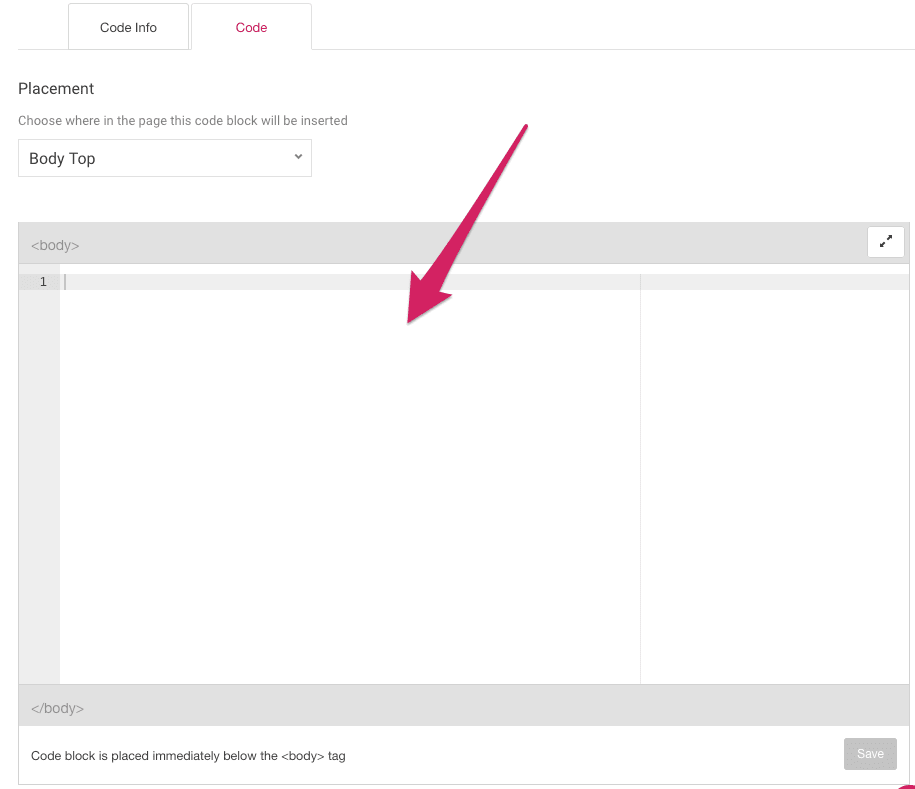
The placement you chose will determine the tags shown above and below the code box, i.e. if you chose Head, then you would see <head> and </head> tags above and below the code box, respectively.
Keep the following in mind when entering your code:
- Simply type HTML directly into the field
- To include CSS, enclose the CSS code within <style> tags
- To include JavaScript, enclose the JavaScript code within <script> tags
- You can find a reference to Uberflip JavaScript Hub events that you can hook into in this article.
Important
Uberflip loads the jQuery 3.3.1 library into all Hub code by default. To use jQuery in your Custom Code, simply write jQuery within <script> tags, using the Body Bottom placement.
Please do NOT link the jQuery library from jQuery's public CDN in your code. Doing so can cause conflicting versions of jQuery to be loaded, which can break key functionality in your Hub.
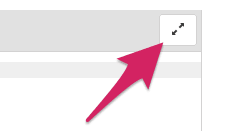
You can expand the code box to fullscreen by clicking on the Expand button in the top right:
To save your code at any time, click on the Save button in the lower right corner:
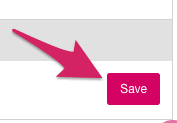
Changes to the code you enter aren't saved automatically, so remember to save your work regularly!
Tip
The code editor we use here is called Ace Editor, and it has lots of useful keyboard shortcuts. For example:
- Press
Ctrl+ForCmd+Fonce to open Find, and twice to open Replace - Press
Ctrl+,orCmd+,to open the options menu
You can find a full list of keyboard shortcuts here.
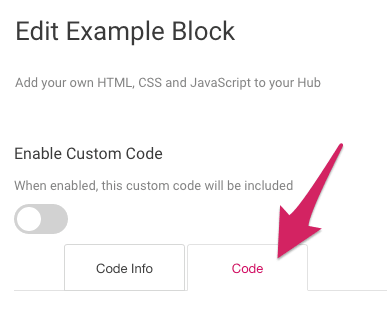
Step 4: Enable the Custom Code block
The last step is enabling your block, which makes the code it contains take effect. To do that, simply toggle the switch under Enable Custom Code to the on (green) position:
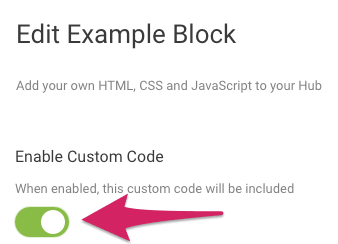
This switch is accessible on the Edit block menu, regardless of whether you are on the Code Info or Code tabs.
Enabling a Custom Code block will cause all the code it contains to be used as part of your Hub. This change will take effect immediately.
At this point, you can also optionally choose to assign the block to a Privacy Group. For details about what Privacy Groups are, and how to set them up and use them, see this article.
Manage Custom Code
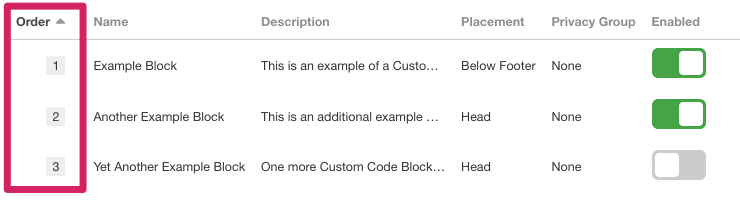
Whenever you create a Custom Code block, it is added to the Custom Code table in your Hub (Appearance > Custom Code):
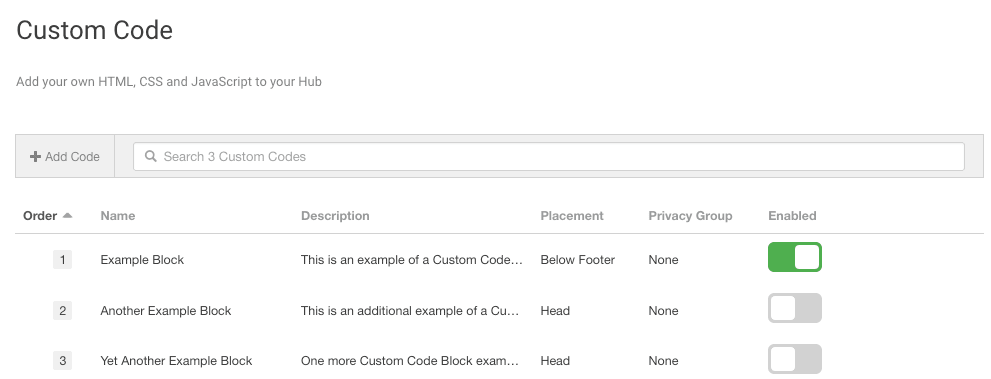
This table lists every existing Custom Code block in your Hub. For each block, you can see:
- Order: The order in which the block is loaded, relative to other blocks with the same placement
- Name: The name that was given to the block
- Description: The description that was entered for the block
- Placement: The block's placement
- Privacy Group: The Privacy Group that the block is assigned to, if any
- Enabled Status: Whether or not the block is currently enabled
From here, you can enable/disable blocks, edit/delete blocks and change the block order.
Enable or disable blocks
You can quickly enable or disable any block directly from custom code table. Simply use the toggle switch to the right of the block you want to enable or disable:
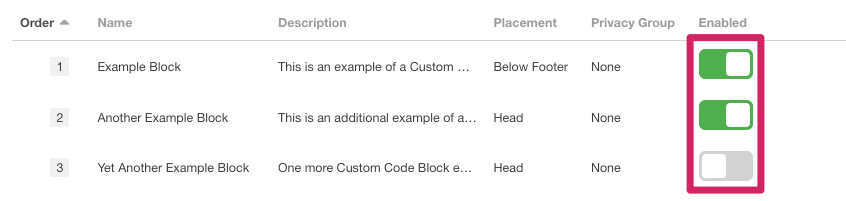
Your change will take effect immediately.
Edit or delete blocks
You can make changes to an existing block, or delete it, at any time. To do that, hover your mouse over the block in the Custom Code table, and the Edit and Delete buttons will appear:

Click on the Edit (pencil) button to enter the Edit block menu, or on the Delete (trash) button to permanently delete the block.
Change block order
The order in which Custom Code blocks are inserted into the Hub code is determined by their placement. As a result, we generally recommend grouping related functionality into the same block, i.e. placing all CSS in a single block, etc. Within a single block, code is executed from top to bottom as normal, so you can determine the order in which functionality loads by structuring the code accordingly.
Sometimes, you may need to break out different functionality into separate blocks, for example if you need to be able to turn on and off specific tracking scripts independently of one another. If you have multiple separate blocks that all use the same placement, the order in which they will be loaded is the order shown in the Custom Code table:
If needed, you can modify this order by assigning a specific place in the order to any given block. To do so, click on the block's order number under the Order column, which will make it editable:
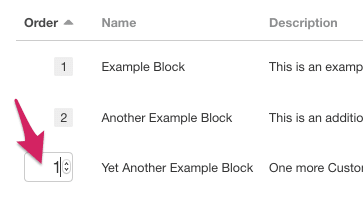
Now, simply type in the number in the order where you want the block to appear (or use the arrow buttons), and press Enter. The block will be moved to the specified position in the order:
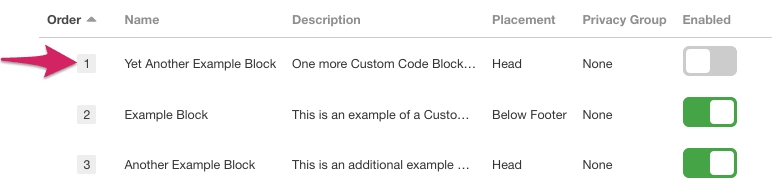
All other blocks affected by this change (i.e. any blocks below the new position of the block that was moved) will automatically be pushed down in the order by one position.
Keep in mind that all blocks will still be loaded based on placement first. For example, a block with a Head placement will always be loaded before a block with a Below Footer placement, regardless of their places in the order.
Notes
- If you have OnBrand customizations in your Hub, keep in mind that these are also added as Custom Code blocks. While you are still able to add your own Custom Code, be careful not to accidentally disable the OnBrand blocks, or to modify the existing code inside them.
- As a best practice, you should put all JavaScript in one block if possible. If you also have OnBrand customizations, this means placing your own JavaScript code in the same block as the OnBrand JavaScript code. In this case, your code should go above the OnBrand code.
- All JavaScript must be ES5; ES6 is not supported.
- When creating blocks, keep dependencies in mind: in some cases, a section of code might require other code that lives in a separate block to be executed first. The execution order is determined by placement and block order, so be sure to account for any dependencies when choosing your placements and/or order.