The Reco Embed Widget App
What is it?
This is an independent script that will embed Uberflip tiles on your site in a completely different way. Those tiles, when clicked, will launch a unique viewer experience that will keep visitors on your site much like Site Engager but with different bells and whistles.
Check out the live demo: https://flipbot.uberflip.com/widgets/reco-embed-viewer/demo.html
How does it work?
By leveraging the same powerful data that Site Engager uses to recommend content for particular website pages, tiles are generated using the same look and feel as Uberflip’s “Embed Stream Tiles”, but rather than having to grab embed codes for every stream, a single javascript will load those tiles wherever you specify on a page. Meaning there’s no need for multiple embed codes.
The viewer experience is completely unique and requires some configuration, but otherwise leverages Site Engager rules and templates that you configure inside Uberflip.
Is there anything I should know before I get started?
The Reco Embed widget is powered by Uberflip's built-in Site Engager technology. This means that it leverages Site Engager's backend settings (Rules and Templates), so you will need to configure these settings to get the widget to work properly. Before you get started, you should familiarize yourself with Site Engager and have a good understanding of how it works. To learn about Site Engager, see this article in the Uberflip knowledge base.
Also, note that the Reco Embed widget is intended for use on sites other than your Uberflip Hub. While you can use it on your Hub, this can result in unintended side effects, such as changes to the appearance of your Items.
How do I use this app?
Step 1: First, install the Reco Embed Widget app from the Uberflip Marketplace.
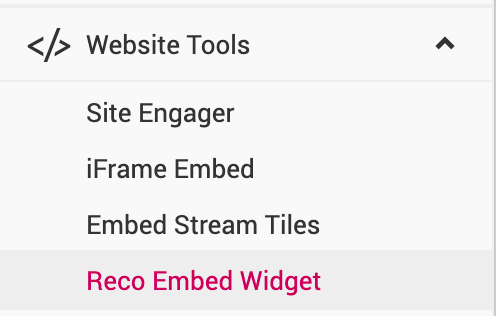
Step 2: Once the app is installed, you’ll need to configure your script. To do that, log in to Uberflip and go to Hubs > Website Tools and click on the Reco Embed Widget option:
This will open the app's settings. Use the Configure tab to configure the script.
Note
To do this, you’ll need to know your Hub’s Hub ID. See here for instructions on how to find it.
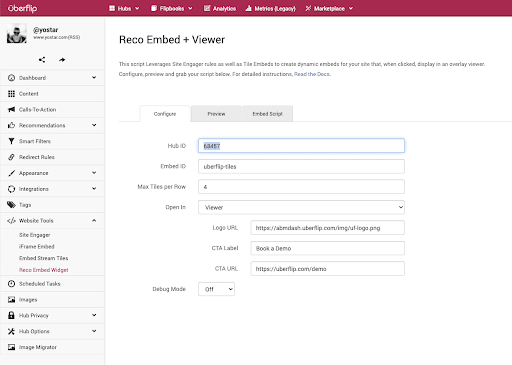
Here is a breakdown of all the different configuration options:
- Hub ID: Enter the Hub ID that you want to display content from.
- Embed ID: Enter a unique id value for the HTML <div> element where you want the embedded tiles to be displayed. By default, the app assumes you will create a new <div> element with the id "uberflip-tiles". If you want to embed the tiles in an already existing <div> element on your website, enter the id value of that element instead (e.g. for <div id="my-custom-element"></div>, enter my-custom-element).
- Max Tiles per Row: Enter the number of tiles that you want to display on a single row.
- Open In (desktop): Select one of the following options to set the behavior when a tile is clicked on a desktop device:
- “Viewer” → Will open item in the in-line viewer
- “Self” → Will open item in the current window/tab
- “New” → Will open item in a new window/tab
- If you choose the "Viewer" setting above, you can also configure these additional options:
- Logo URL: Enter the URL for an image file of your company logo
- CTA Label: Enter a label for the button that will display under your logo
- CTA URL: Enter the URL that the CTA button will link to
- Open In (mobile): Select one of the following options to set the behavior when a tile is clicked on a mobile device:
- “Viewer” → Will open item in the in-line viewer - no left panel will display
- “Self” → Will open item in the current window/tab
- “New” → Will open item in a new window/tab
- Auto Link URLs On Page: Set this to “on” to open on-page links in the Viewer (rather than a new browser tab) if the link points to an Item that exists in your Embed. This option allows you to sprinkle calls-to-action throughout the webpage in addition to the embed tiles, while still keeping visitors on the page if they click on those links.
- Note: To be auto-linked, the URL in the link's href value must be exactly the same as the URL of an Item in the returned data set from Site Engager.
- Debug: If set to “on”, the app will generate console messages to help developers with debugging when the app is used on your site.
Step 3: Once you've configured the script, you can preview the result by clicking the Preview tab. If you need to make any changes, return to the Configure tab and then preview again. When you're happy with the result, proceed to the next step.
Step 4: Next, add the script provided by the app to your website to enable the widget on that site.
To get the script, go to the Embed Script tab. The app will generate a script according to the settings you configured. It will look something like this:*
/* Uberflip Reco Embed Viewer */
var ufRecoEmbedViewerConfig = {
'base' : 'https://flipbot.uberflip.com/',
'logo' : 'https://yoursite.com/logo.png',
'embed_id' : 'uberflip-tiles',
'cta_label' : 'Book a Demo',
'cta_url' : 'https://yoursite.com/request-demo/',
'max_per_row': 4,
'hub_id' : 123,
'open_in' : 'viewer',
'open_in_mobile' : 'viewer',
'debug' : false
};

jQuery.when( jQuery.getScript(ufRecoEmbedViewerConfig.base + '/widgets/reco-embed-viewer/uf-reco-embed-viewer.min.js') ).done(function(){
ufRecoEmbedViewer.init( ufRecoEmbedViewerConfig );
});
Simply copy the script from the Embed Script tab (don't copy the example above!), then paste it in the code of the page where you want to use the widget. You can either:
- Paste the script directly into the code of specific pages of your website to only use the widget on those pages, or
- Use a tag manager (like Google Tag Manager) to use the widget on all pages on your website
Keep in mind that just adding the script does not cause the widget itself to be displayed on any pages — you'll set that up in the next step.
Note
The script uses jQuery, so your website must load jQuery for the script to work. To check if your website has jQuery, or to install it if not, check with your site administrator.
Step 5: To display the widget on a page, you need to add a specific <div> element to that page. When this element is present on a page, the widget will be displayed in that location on the page.
To place the <div> element, simply copy the following snippet and paste it in the code of any page where you want the widget to appear:
<div id="uberflip-tiles"></div>What part of Site Engager will be used?
If you changed the value of Embed ID from the default "uberflip-tile" on the Configuration tab of the app, you'll also need to change the id value in this snippet to the value you chose.
Site Engager has both Rules and Templates. You can either rely on existing Rules and Templates or set new ones just for this embed widget - it’s up to you.
For Rules, these determine which pages to trigger and what content to display - so this fully applies here.
For Templates, some settings are used and others are non-applicable. You can assume if a template setting is not listed below, it’s simply non-applicable and it doesn’t matter what you set it to for this embed widget. Here’s what does matter:
Display Options:
- Max. Items to Display:
Will be used to determine how many tiles display both as embedded tiles and in the list when the viewer is open. - Max. Item Age:
Will still be used to determine if a tile shows or not based on its age. - Enable Exit Intent Popup:
Will respect your setting here. If enabled, on exit intent the viewer will display with the next sequential item that the visitor hasn’t viewed yet (a good reason not to use this widget in combo with the native Site Engager — they’ll likely combat each other). - Brand Color:
Will be used to determine the CTA button’s background color as well as other UI accents. - Timers > Show Exit Again:
Will be used if Exit Intent is enabled to not trigger the exit intent again after closing the viewer, before the specified time has elapsed.
Labels:
- Next:
Will be used to populate the label on the “next” flyout on the right-hand side when the viewer is open.
Do I need Site Engager Installed on my site as well?
No! That’s the beauty - you can use this embed instead, and get the benefit of both tiles and a viewer. That said, you could use both - at your own risk :) The only obvious issue is if you enable exit intent, they’ll both fire at the same time.
Can I set this up to display multiple widgets on one page?
No, you can only display the widget in a single location on any given page. This is a system limitation, because the widget is driven by Site Engager rules, and Site Engager only allows for one rule per page. (Please also don't try to add multiple instances of the embed code to the page, as this won't work.)
It is possible to customize the widget to split the tiles among multiple locations on the page. This is not available by default, and would require development work. See the Advanced section below for more information.
How do I display the widget on multiple separate pages?
Because the widget leverages Site Engager rules to determine which tiles are displayed on which pages, you can simply create Site Engager rules as needed. Site Engager's rules also allow you to define which tiles the widget displays depending on the page where it is placed. For instructions on how to set up Site Engager rules, see the article on Site Engager in the Uberflip knowledge base.
Is this a supported feature by Uberflip?
No. This is an independent widget that makes use of supported elements of Uberflip, but its features and functionality are not tested and supported by Uberflip.
Advanced: How can my developers leverage this further?
Good question :) There is an event and a couple functions that can be used to further leverage the data being returned and customize your website further. Developers can edit the embed code generated and insert additional functionality. Here’s an example:
/* Uberflip Reco Embed Viewer */
var ufRecoEmbedViewerConfig = {
..
};

jQuery.when( jQuery.getScript(...) ).done(function(){

ufRecoEmbedViewer.init( ufRecoEmbedViewerConfig );
//do stuff once data is available
ufRecoEmbedViewer.on('dataLoaded', function(){
var data = ufRecoEmbedViewer.getData();
console.log("we loaded the data!! here it is:", data );
if(data.items.length ){
$('#custom-message').text('This Content is Just for You :)');

//load the first item after 5 seconds
setTimeout(function(){ ufRecoEmbedViewer.loadItem(0); },5000);
}
});
});
So what’s happening here? Well, within the code block you can capture the data loading event
( ufRecoEmbedViewer.on('dataLoaded', function(){ … }); ~)
and “do stuff” like:
- Get the data ( ufRecoEmbedViewer.getData() ~) that’s returned by Site Engager - there’s tons of goodies in here including the items as well as the rules and template data.
- Load an item whenever you like ( ufRecoEmbedViewer.loadItem(i) ~) where i is the index in the items array (i.e. 0 is the first item,etc)