Bulk Task Smasher: Configure permissions to control access to app features
Learn how to configure Bulk Task Smasher user permissions to determine which app features your users can access.
Before you begin
- To configure app permissions, you need to be a member of the Account Administrators or Content Managers user groups.
- To configure these settings, the Bulk Task Smasher Marketplace app must be installed in your Hub.
About Bulk Task Smasher permissions
Bulk Task Smasher is a very powerful tool, and can rapidly make extensive changes to an Uberflip account that may be difficult (or even impossible) to reverse. As a result, we strongly recommend that you restrict access to Bulk Task Smasher within your organization to only trusted users who understand how the tool works and how to use it.
To help you do that, Bulk Task Smasher hooks into Uberflip's permissions system, and features app-specific permissions which you can configure to control access to the app itself, as well as to specific functions (bulk actions) within the app.
How Bulk Task Smasher permissions work
When you install the Bulk Task Smasher Marketplace app in your Uberflip account, the app will:
- Create a set of permissions in your account, each of which controls access to specific functionality in the Bulk Task Smasher app
- Grant the available permissions to the Account Administrators user group by default
Below is a breakdown of the permissions Bulk Task Smasher creates, along with the functionality the permission controls:
|
Permission |
Allows the user to... |
| Bulk Task Smasher | Access the app (by making the "Bulk Task Smasher" option in the Uberflip sidebar menu visible) as well as Export bulk actions for all available resources in the app |
| Create Operators | Access Create bulk actions for all available resources in the app |
| Update Operators | Access Update bulk actions for all available resources in the app |
| Delete Operators | Access Delete bulk actions for all available resources in the app |
Configure Bulk Task Smasher permissions
By default, all members of the Account Administrators user group are granted all available Bulk Task Smasher permissions.
If you want to use non-default user groups with Bulk Task Smasher, or if you want to restrict access to certain functions, you can configure Bulk Task Smasher's permissions by either granting or revoking permissions as needed. As with all Uberflip permissions, you can grant or revoke permissions at either the user group level (which affects all users within the user group), or at the individual user level (which affects only that user, unless they are also a member of a user group that grants the permissions).
- To configure permissions for Bulk Task Smasher, log in to the Uberflip backend (app.uberflip.com).
- In the top right, click on your name, then click on Account Settings:
- In the sidebar menu, click on Organization. Then, click on:
- Users if you want to configure permissions for specific users only.
- Groups if you want to configure permissions for all members of a user group.
- Next, click on the user or user group (depending on your choice in the previous step) for which you want to modify permissions.
- While viewing the user or user group, click on the Permissions tab.
- Scroll to the bottom of the list of permissions, where you should see a Bulk Task Smasher section:
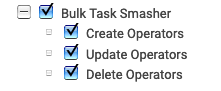
- Here, simply grant or revoke permissions as required:
- To give access to a feature for the selected user/user group, check the box beside the corresponding permission to grant it.
- To remove access to a feature for the selected user/user group, uncheck the box beside the corresponding permission to revoke it.
- Your changes will be saved automatically, and will take effect immediately.
Important
If you grant any of the available child permissions (Create/Update/Delete Operators), you must also grant the parent Bulk Task Smasher permission. If you do not do this, the child permissions will have no effect, as users who do not have the parent permission will not be able to access the app.