Custom Domain: Set up your Hub on a subdomain
Learn how to set up a custom domain to host your Hub on a subdomain of your website (like resources.mycompany.com).
Before you begin
- To add a custom domain to your Hub, you need to a member of the Account Administrators user group.
- This article will assume that you already know what a custom domain is and have decided on the subdomain option. If you're not sure what a custom domain is and why you'd want to use it, read this article first.
- The setup process outlined in this article involves making some changes to your website hosting configuration, so you will likely have to work with your IT or website team to complete the those steps.
Another way to learn 📺
Check out the Uberflip Academy for a video overview on setting up custom subdomains.
About setting up a Hub on a subdomain
In this article, we will look at the setup process for a custom domain if you have chosen to use the subdomain option. The purpose of setting up a custom domain is to make your Uberflip Hub look like it's part of your website, even though it's being hosted on Uberflip's servers. With a subdomain, this means making your Hub accessible under a URL like resources.mycompany.com, i.e. a subdomain of your website's main domain.
To do this, you'll need to set up the subdomain to point at your Hub by creating a CNAME record with your web hosting provider. A CNAME record is essentially an alias: it tells a browser "if a user asks for URL A, tell them that they're looking at URL A, but actually show them content from URL B instead." In this case, URL A is your subdomain, and URL B points to your Hub on Uberflip's servers.
Here's a breakdown of how this process works:
- Your Hub is hosted on Uberflip's servers at read.uberflip.com. This is the domain where we host all Hubs.
- To get to your Hub, you want your users to visit a URL that's part of your website. This will be a subdomain of your website, in the form of [something].mycompany.com.
- First, you'll create the subdomain you want to use. Let's say you choose resources.mycompany.com.
- Next, you'll set up a CNAME record that points resources.mycompany.com at read.uberflip.com. This takes anyone who goes to resources.mycompany.com to read.uberflip.com instead, but makes it look like they're still on resources.mycompany.com.
- Finally, you register resources.mycompany.com as a custom domain on your Uberflip account, then associate it with the target Hub. This tells Uberflip's servers which Hub to serve up when a visitor arrives at read.uberflip.com from resources.mycompany.com.
Step 1: Choose a subdomain name
The first step is deciding what to name your Hub's new subdomain. This is where your visitors will go to access your Hub, so it's time to get creative! We recommend choosing something that describes what your visitors can expect to find in your Hub. Here are some examples to get you started:
- resources.mycompany.com
- insights.mycompany.com
- learn.mycompany.com
- community.mycompany.com
- hub.mycompany.com
Step 2: Create the subdomain and set up a CNAME record
When you have decided on the name for your Hub's subdomain, all that's left is to create it as a subdomain of your existing website. Initially, your newly created subdomain won't actually point at anything: anyone who goes there would see a 404 Not Found error. To fix that, you'll also need to point the subdomain at Uberflip's servers by creating a CNAME record with your hosting service provider.
In most cases, you'll need to have your website admin or IT team create the subdomain and set up the CNAME for you. Ask them to complete the following steps:
- Create a subdomain on the root domain. The specific subdomain name to be created is [fill in subdomain you chose, e.g. hub.mywebsite.com].
- Create a CNAME record with your domain provider that points [fill in subdomain you chose] to the hostname read.uberflip.com (e.g.
hub.mywebsite.com CNAME read.uberflip.com) You can usually find instructions on how to create a CNAME record in your domain provider's help documentation.
Once the subdomain and CNAME record have been set up, you can test if it's working properly:
- Go to whatsmydns.net.
- In the URL field at the top, type in your new subdomain.
- Use the dropdown menu to select CNAME.
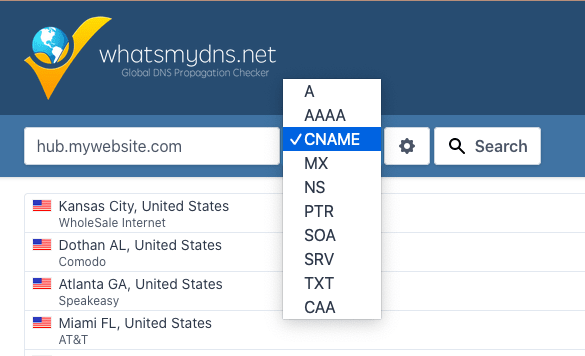
- Click on Search.
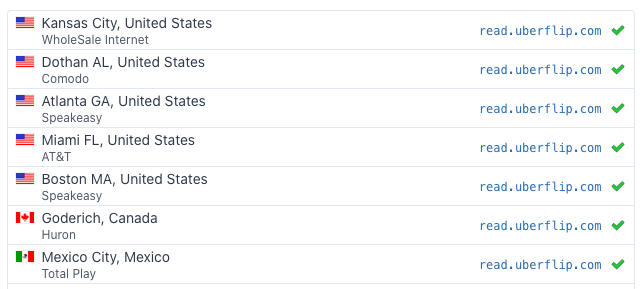
- In the list of servers shown on the page, you should see read.uberflip.com as the result for all servers, like this:
- If you see any errors, let your website admin/IT team know so they can troubleshoot.
Step 3: Link the subdomain to your Hub in Uberflip
You've now set up your new subdomain so that anyone who visits it will be taken to Uberflip's servers at read.uberflip.com. At this point, the subdomain isn't associated with a Hub on the Uberflip side yet, so anyone who goes there would see an error saying that the Hub couldn't be found. To fix this, you need to register the new subdomain in your Uberflip account, then link it to your Hub.
- Log in to your Uberflip account, click on Hubs in the menu bar at the top, then click on the Hub that you want to link to the new subdomain.
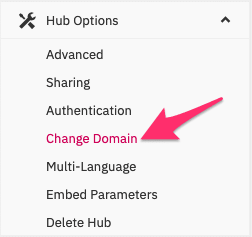
- In the sidebar menu on the left, click on Hub Options to expand that section, then click on Change Domain:
- This will open the Move Hub to another Domain page. Here, click on the + Add a Domain button:

- In the Add a Domain menu, type your custom subdomain into the field provided:
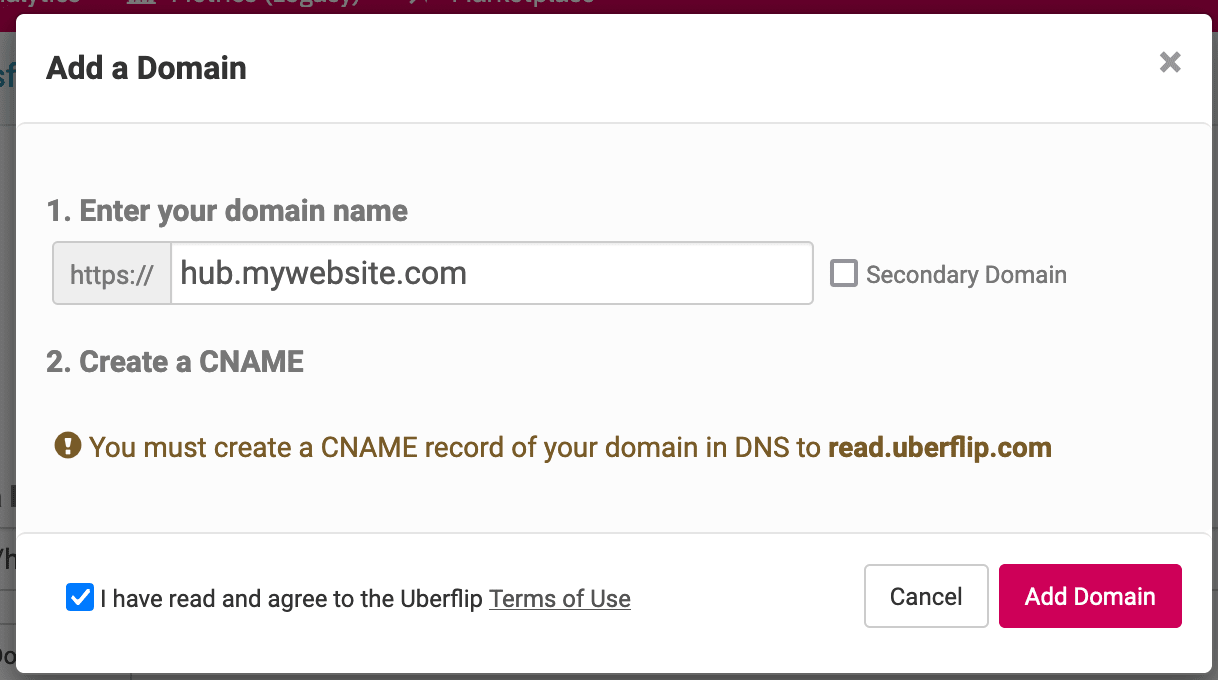
- Should I check the Secondary Domain box? This is only used in specific situations, so leave this box unchecked unless an Uberflip representative has specifically instructed you to check it.
- Check the box next to I have read and agree to the Uberflip Terms of Use, then click on the Add Domain button.
- You can now move your Hub onto the newly added domain. On the Move Hub to another Domain page, use the Select a Domain dropdown menu to choose the subdomain you just created.
- Finally, click on the Move Hub button to complete the process:
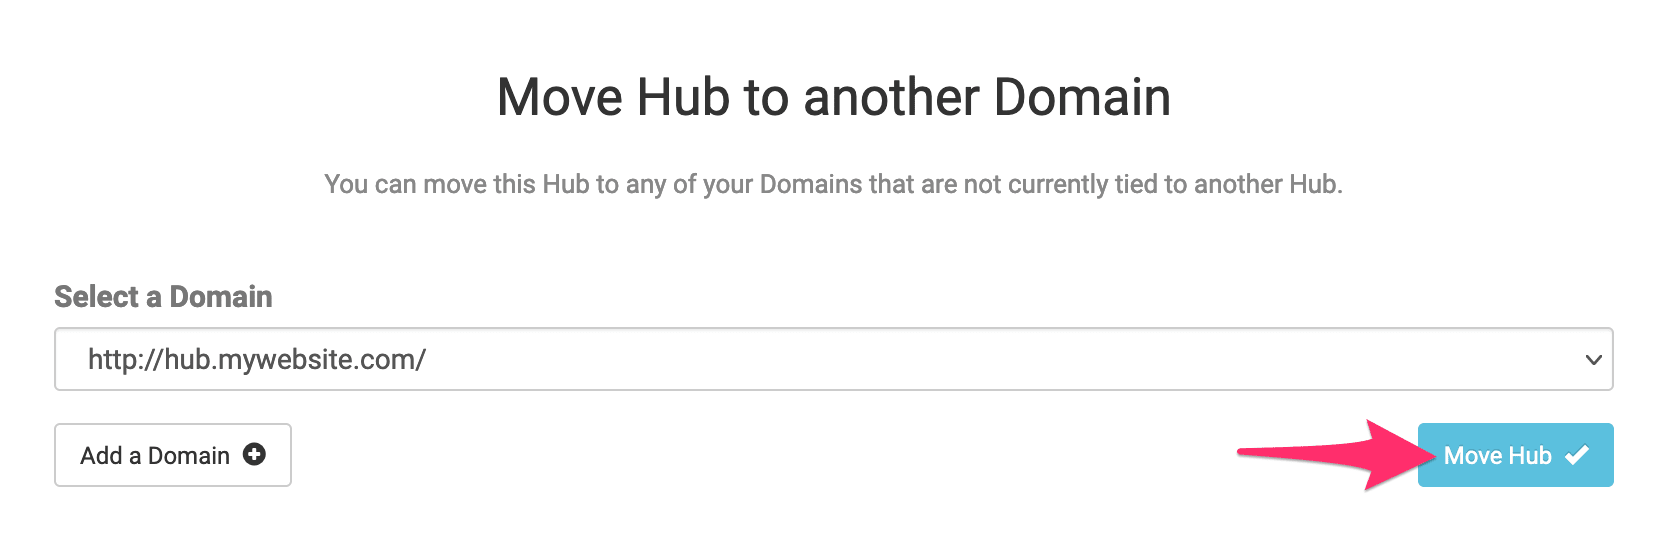
- You should see a message at the top of the window confirming that you've successfully moved your Hub onto a custom domain. From now on, the subdomain URL you chose will be the main URL for your Hub.
Info
When you add a domain to your account, it will have HTTPS encryption enabled on it by default. Uberflip will automatically provision and enable an SSL certificate (from Let's Encrypt) for your new domain, so you don't need to provide your own certificate or perform any further setup. For more details on how this works, see this article.
Note
When you move a Hub onto a new domain, Uberflip automatically creates a redirect on the old domain, so that any old bookmarks will still work.